Node.js(7) - 데이터베이스, 시퀄라이즈, 몽구스
SQL
mysql 사용시
- prompt로 다음 명령어 작성 : root 명령 권한 연결과 password
mysql -uroot -p
프롬프트로 종료
exit
콘솔 창
sudo apt-get update
sudo apt-get install -y mysql-server
mysql_secure_installation
데이터베이스 생성한 후 사용하기
create schema 'node.js' default character set utf8;
use node.js;
create schema 데이터베이스 이름 default character set ut8;
use 데이터베이스 이름;
데이터베이스 안에 테이블(comments) 생성해주기
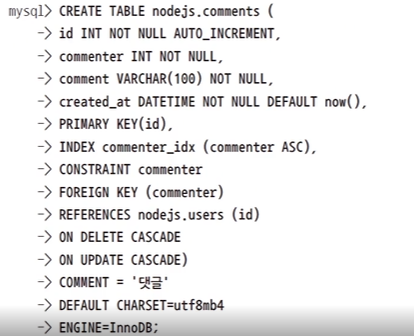
- create table 데이터베이스명.테이블이름 ( 칼럼1 : 속성, 칼럼2 : 속성, 칼럼3: 속성 .... 순으로 적어주기 )
id INT NOT NULL AUTO_INCREMENT
- 칼럼 명 옆의 있는 것들은 컬럼에 대한 옵션(속성)임
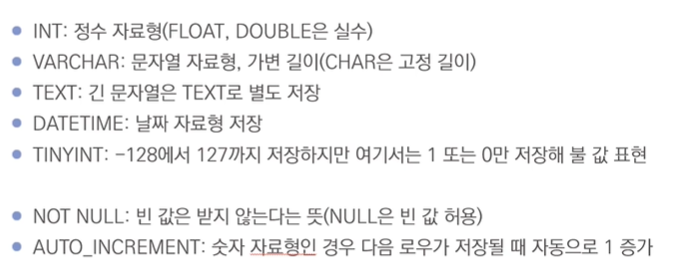
칼럼에 대한 옵션 종류들

CRUD
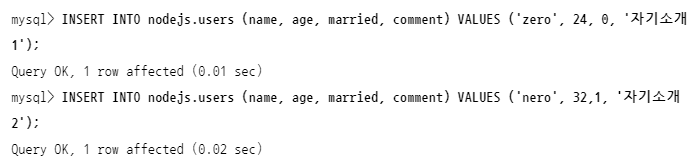
Create
- 데이터를 생성해서 데이터베이스에 넣는 작업이다.
- users 대신 users만 사용한다.
형식
- INSERT INTO [테이블명] ([컬럼1], [컬럼2], .. .) VALUES ([값1], [값 2], ...)
users 테이블
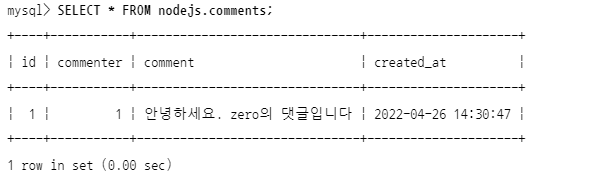
comments 테이블

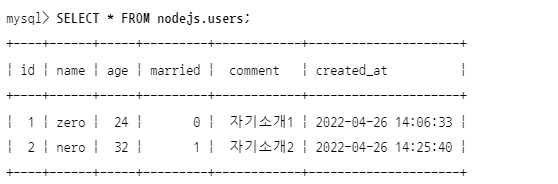
Read
- 데이터베이스에 있는 데이터를 조회하는 것
- SELECT * FROM [테이블명]
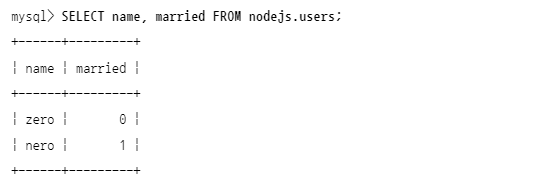
이름 칼럼과 결혼 칼럼만 뽑아서 조회하기
- SELECT 칼럼1, 칼럼2 FROM 테이블이름;
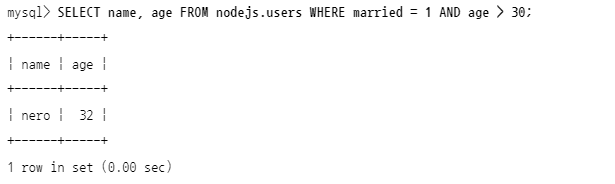
- SELECT 칼럼1, 칼럼2 FROM 테이블이름 WHERE 조건절(보통 AND, OR을 작성하고 있음)
- 특정 조건을 가진 데이터들만 조회하기

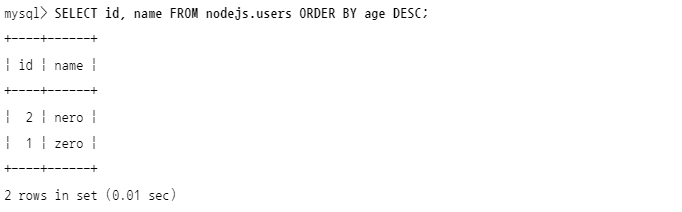
- ORDER BY [컬럼명] [ASC|DESC]
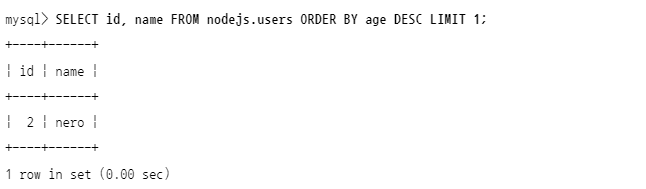
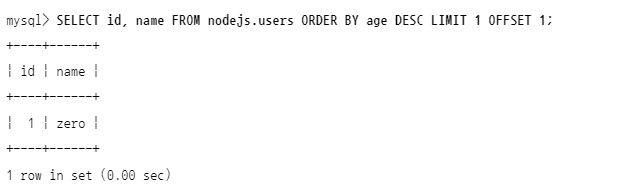
- 첫 번째 페이지에서 1~20번 게시물을 조회했다면, 두 번째 페이지에서는 21~40번 게시물을 조회해야 한다.
OFFSET [건너뛸 숫자]
-
Update
- 데이터베이스에 있는 데이터를 수정하는 작업
- UPDATE [테이블명] SET [컬럼명=바꿀 값] WHERE [조건];

Delete(삭제)
- DELETE FROM [테이블명] WHERE [조건]

시퀄라이즈 (Sequelize)
- ORM(Object-relational Mapping)
- 자바스크립트와 데이터베이스의 릴레이션을 매핑해주는 도구
sequelize, sequelize-cli, mysql2 패키지 설치해주기
npm i express morgan nunjucks sequelize sequelize-cli mysql2
npm i -D nodemon
sequelize-cli
- 시퀄라이즈 명령어를 실행하기 위한 패키지
mysql2
- Mysql과 시퀄라이즈를 이어주는 드라이버
- 얘는 데이터베이스 프로그램이 아니다.!!
설치 완료 후 sequelize를 초기화 해주기
npx sequelize init
시퀄라이즈로 익스프레스와 MySQL을 연결해준다.
app.js
const express = require('express');
const path = require('path');
const morgan = require('morgan');
const nunjucks = require('nunjucks');

const {sequelize} = require('./models'); //require('./models')는 require('./models/index.js')와 같다.

const app = express();

app.set('port', process.env.PORT || 3001);
app.set('view engine', 'njk');
nunjucks.configure('views' ,{
    express : app,
    watch : true,
});


sequelize.sync({force : false}).then(() => {
    console.log('데이터베이스 연결 성공');
    //

}).catch((err) => {
    console.error(err);

});


app.use(morgan('dev'));
app.use(express.static(path.join(__dirname, 'public')));
app.use(express.json());
app.use(express.urlencoded({extended : false}));


//에러 미들웨어 -
app.use((req, res, next) =>{
    const error = new Error('${req.method} ${req.url} 라우터가 없습니다.');
    error.status = 404;
    next(error);
});

//에러 미들웨어 -
app.use((err, req, res, next) => {
    res.locals.message = err.message;
    res.locals.error = process.env.NODE_ENV !== 'production' ? err : {};
    res.status(err.status || 500);
    res.render('error');
})


app.listen(app.get('port') , () =>{
    console.log(app.get('port'), '번 포트에서 대기 중 ');
});
config/config.json
/*자동으로 생성한 config.json에 operatorAliases 속성이 들어 있다면 삭제해야 한다. */

{

  "development": {
    "username": "root",
    "password": null,  //root의 비밀번호
    "database": "nodejs",
    "host": "127.0.0.1",
    "dialect": "mysql"
  },
  //development.password와 development.database를 현재 MySQL 커넥션과 일치하게 수정하기
  "test": {
    "username": "root",
    "password": null,
    "database": "database_test",
    "host": "127.0.0.1",
    "dialect": "mysql"
  },
  "production": {
    "username": "root",
    "password": null,
    "database": "database_production",
    "host": "127.0.0.1",
    "dialect": "mysql"
  }
}

//test , production은 각각 테스트 용도와 배포 용도로 접속하기 위해서 사용하는 것이기 때문에 지금 당장 설정하진 않는다.
모델 정의
- MySQL에서 정의한 테이블(nodejs)을 시퀄라이즈에서도 정의해주기
- MySQL의 테이블은 시퀄라이즈의 모델과 대응되고, . 시퀄라이즈는 모델과 MySQL의 테이블을 연결해주는 역할을 한다.
- User와 Comment 모델을 만들어 users 테이블과 comments 테이블에 연결해준다.
- 시퀄라이즈는 기본적으로 모델 이름은 단수형으로, 테이블 이름은 복수형으로 사용한다.
models
ㄴ index.js
ㄴ user.js
models/user.js
const Sequelize = require('sequelize');

class User extends Sequelize.Model {  // User 모델 선언
    static initiate(sequelize) {
        User.init({
            name : {
                type : Sequelize.STRING(20),
                allowNull : false,
                unique : true,
            },
            age : {
                type : Sequelize.BOOLEAN,
                allowNull : true,

            },
            created_at : {
                type : Sequelize.DATE,
                allowNull : false,
                defaultValue : Sequelize.NOW,

            },
        }, {
            sequelize,
            timestamps : false,
            modelName : 'User',
            tableName : 'users',
            paranoid : false,
            charset : 'utf8',
            collate : 'utf8_general_ci'
        });
    }

    static associate(db) {}
};

module.exports = User;  //User모델을 모듈로 export함
static initiate(sequelize) { }
- 테이블에 대한 설정을 한다.
user.init 메서드
- 테이블 칼럼들에 대한 설정
- 알아서 id를 기본 키로 연결하므로 id 컬럼은 적어줄 필요가 없음
- MySQL 테이블과 컬럼 내용이 일치해야 정확하게 대응된다.
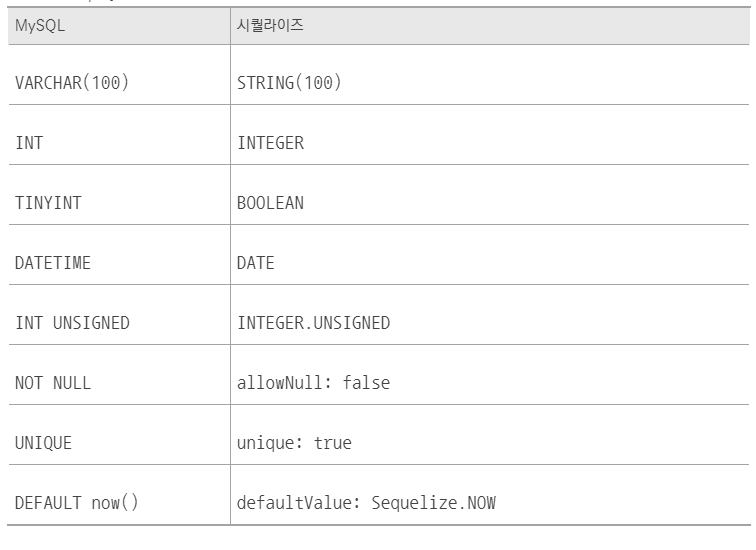
sequelize, 메서드
- 테이블 자체에 대한 설정
- 시퀄라이즈는 MySQL 외의 다른 데이터베이스도 처리할 수 있어야 하므로 MySQL의 자료형과는 달라야 한다.
- static initiate 메서드의 매개변수와 연결되는 옵션임
- model/index.js에서 연결된다.
- db.sequelize 객체를 넣어주어야 한다.
timestamps 메서드
- timestamps 속성이 true이면 시퀄라이즈는 createdAt과 updatedAt 컬럼을 추가해주어야 한다.
- 각각 로우가 생성될 때와 수정될 때의 시간이 자동으로 입력됨(날짜 칼럼 자동 추가)
- 기본적으로 false를 두는 것이 좋음
underscored 메서드
- 다른 모델과의 관계를 적는다.
- 시퀄라이즈는 기본적으로 테이블명과 컬럼명을 캐멀 케이스(camel case)(예시: createdAt)로 만드는데, 이를 스네이크 케이스(snake case)(예시: created_at)로 바꾸는 옵션이다. -> A를 _a로 바꿔줌(대문자를 소문자_로 바꿔주는 것)
- 여기서는 사용하지 않았음
modelName 메서드
- 모델 이름을 설정한다.
tableName
- 실제 데이터베이스의 테이블 이름이다.
- 위에서의 modelName 메서드에 적은 모델 이름을 소문자 및 복수형으로 만들어준다.
- 모델 이름이 User이라면 테이블 이름은 users가 된다.
paranoid
- true라고 설정하면 deletedAt이라는 컬럼임
- 로우값을 삭제할 때 (고객 데이터를 삭제할 때) 완전히 지워지지 않고 deletedAt이라는 지운 시각이 기록된다.
- row값을 조회하라는 명령을 내렸을 때 deletedAt의 값이 null인 로우를 조회하는데, 이렇게 하는 이유는 나중에 로우값을 복원하기 위해서이다. 즉, true로 설정하게 되면 로우를 복원하는 것이 가능함
charset, collate
- 각각 utf8과 utf8_genral_ci로 설정해야 한글이 입력됨
- 이모티콘을 입력할 수 있도록 하기 위해서라면 utf8mb4와 utf8mb4_general_ci를 입력해야 한다.
static associate(db) { }
models/comment.js
const Sequelize = require('sequelize');

class Comment extends Sequelize.Model {
    static initiate(sequelize) {
        Comment.init({
            comment : {
                type : Sequelize.STRING(100),
                allowNull : false,
            },
            created_at : {
                type : Sequelize.DATE,
                allowNull : true,
                defaultValue : Sequelize.NOW,
            },
        }, {
            sequelize,
            timestamps : false,
            modelName : 'Comment',
            tableName : 'comments',
            paranoid : false,
            charset : 'utf8mb4',
            collate : 'utf8mb4_general_ci',
        });
    }

    static associate(db) {
        db.Comment.belongsTo(db.User, {foreignKey : 'commenter', targetKey : 'id'});
    }
};

module.exports = Comment;
- commenter이 결국 user인데, 여기서 user테이블을 연동하지 않았음 -> 시퀄라이저 자체(index.js)에서 해도 된다.
user.js와 comment.js를 시퀄라이즈와 연결해준다.
models/index.js
'use strict';

const fs = require('fs');
const path = require('path');
const Sequelize = require('sequelize');
const process = require('process');
const basename = path.basename(__filename);
const env = process.env.NODE_ENV || 'development';
// process.env.NODE_ENV가 development일 때 적용되는데, 나중에 production으로 바꿔 배포 때 사용한다. => config/config.json의 production 속성을 수정한다.
const User= require('./user');
const Comment = require('./comment');
const config = require(__dirname + '/../config/config.json')[env];
const db = {};

let sequelize;
if (config.use_env_variable) {
  sequelize = new Sequelize(process.env[config.use_env_variable], config);
} else {
  sequelize = new Sequelize(config.database, config.username, config.password, config);
}

fs
  .readdirSync(__dirname)
  .filter(file => {
    return (
      file.indexOf('.') !== 0 &&
      file !== basename &&
      file.slice(-3) === '.js' &&
      file.indexOf('.test.js') === -1
    );
  })
  .forEach(file => {
    const model = require(path.join(__dirname, file))(sequelize, Sequelize.DataTypes);
    db[model.name] = model;
  });

Object.keys(db).forEach(modelName => {
  if (db[modelName].associate) {
    db[modelName].associate(db);
  }
});

db.sequelize = sequelize;
db.Sequelize = Sequelize;

// db라는 객체에 User과 Comment 모델을 담는다.  -> require해서 얻어온 User과 Comment 접근이 가능해짐
db.User = User;
db.Comment = Comment;

//  User.initiate와 Comment.initiate는 각각의 모델의 static initiate 메서드를 호출하는 것 : 모델.init이 실행되어야 테이블이 모델로 연결됨
User.initiate(sequelize);
Comment.initiate(sequelize);

// 다른 테이블과의 관계를 연결해주는 것 모델.associate(테이블이름)
User.associate(db);
Comment.associate(db);

module.exports = db;
테이블 간 관계 정의하기
1 : N
- 사용자 한명, 댓글 N개
- hasMany 메서드 사용함
- user 테이블의 row 값 하나를 불러올 때 연결된 comments 테이블의 로우값도 같이 불러오는 것
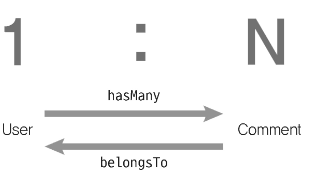
- belongsTo : comments 테이블의 로우를 불러올 때 연결된 user 테이블의 row를 가져오는 것 ( 다른 모델의 정보가 들어가는 테이블에는 belongsTo를 사용한다.)
models/user.js
...
  static associate(db) {
    db.User.hasMany(db.Comment, { foreignKey: 'commenter', sourceKey: 'id' });
  }
};
User - Comment 테이블 간의 관계
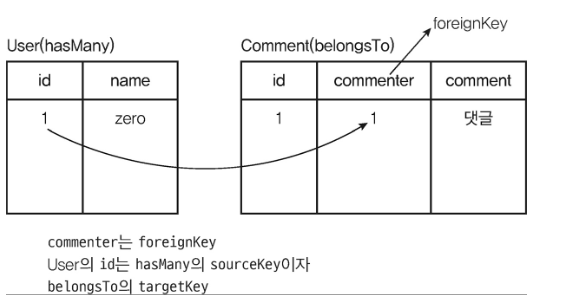
- Comment 모델에 foreignKey(외래 키)인 commenter 컬럼을 추가한다.
- Comment 모델의 외래 키 칼럼은 commenter이고, commenter은 User 모델의 id 칼럼(hasMany의 sourceKey)을 가리킨다.
- belongTo의 targetKey 속성에 id를 넣는다.
models/comment.js
...
  static associate(db) {
    db.Comment.belongsTo(db.User, { foreignKey: 'commenter', targetKey: 'id' });
  }
};
1 : 1
- 사용자와 사용자에 대한 정보 테이블
- hasOne 모델
- 1 : 1 관계라고 해도 belongsTo와 hasOne이 반대가 되면 안된다. belongsTo를 사용하는 Info 모델에 UserId 칼럼이 추가되기 때문
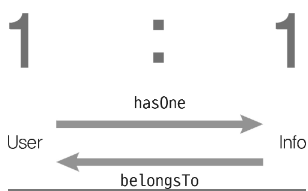
models/User.js
db.User.hasOne(db.Info, { foreignKey: 'UserId', sourceKey: 'id' });models/Info.js
db.Info.belongsTo(db.User, { foreignKey: 'UserId', targetKey: 'id' });
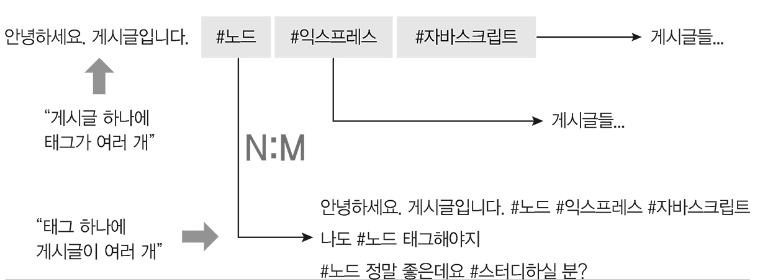
N : M
- 게시글 테이블과 해쉬태그 테이블
- 한 게시글에는 해쉬태그가 여러 개 달릴 수 있고, 한 해시태그도 여러 게시글에 달릴 수 있음
- 게시글과 해쉬태그 모델 간의 다대다(N : M) 관계 표현
🧑💻 NOSQL - MONGODB
🌱 MONGO DB 데이터베이스 생성 과정
1. MONGODB 로컬 서버에 설치하기
2. 어드민 설정하기
- 어드민 권한을 설정하여 디비에 비밀번호 걸기
- admin 권한으로 전환
use admin
- admin 계정 생성
db.createUser({user : '이름', pwd : '비밀번호', roles : ['root']})3. mongod를 입력했던 콘솔을 종료한 뒤에 mongod --auth 명령어로 접속하기
4. mongo를 입력한 콘솔도 종료한 뒤에 mongo admin -u 이름 -p 비밀번호로 접속한다.
+ 나는 참고로 macos 사용자이기 때문에, 몽고 DB를 MAC OS에서 실행할 수 있는 방법을 작성해두려 한다.
🐛 MAC OS 설치방법
brew로 mongodb 설치하기
brew tap mongodb/brew
brew install mongodb-community
몽고디비 실행하기
brew services start mongodb-community
몽고 실행하기
mongo
위의 관리자 계정 명령어는 window와 똑같으므로 관리자 계정을 작성해준 뒤, 콘솔이 전환되게 되면 마지막에 두 줄을 추가해준 뒤 :wq!를 눌러 저장해준다.
security:
   authrization : enabled
다시 몽고디비를 실행하고 다음 명령어를 작성한다.
brew services start mongodb-community
mongo admin -u 이름 -p 비밀번호
몽고 캠퍼스 설치하기
brew cask install mongo-compass-community
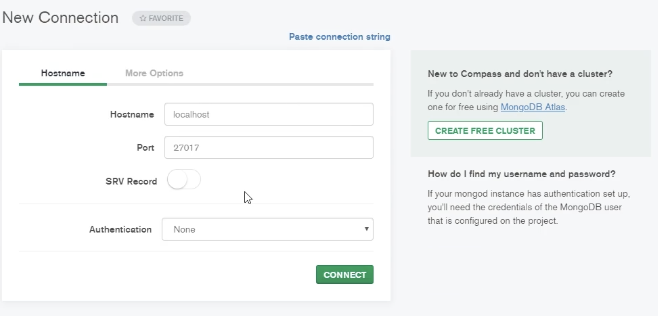
몽고 캠퍼스 Fill in connection fields individuals 선택
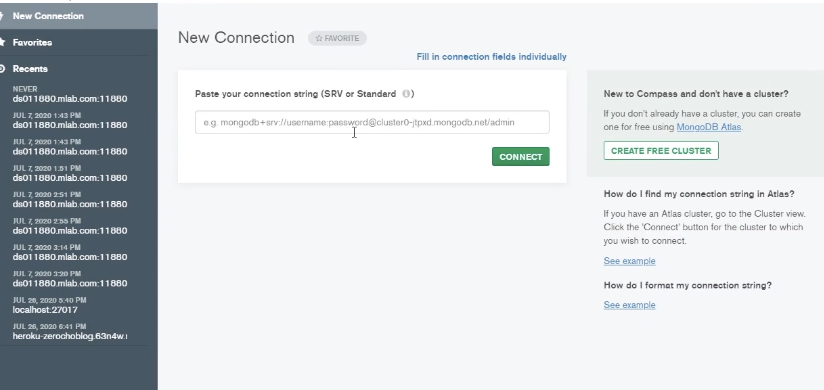
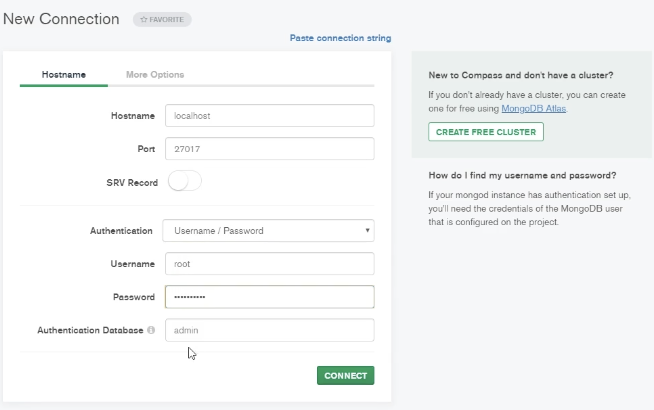
그럼 이런 화면이 뜨는데, 여기서 Authentication을 User/Password 으로 바꿔준다.
그럼 이런 화면이 뜨게 되는데 Username, Password에 관리자 계정 id와 비번을 입력해준다. id는 root값이 된다.
데이터베이스 생성 명령어
use 데이터베이스이름
데이터베이스 목록 확인
show dbs
현재 사용 중인 데이터베이스 확인
db
컬렉션 생성하기
- sql로 치면 테이블 생성 명령어임
db.createCollection('테이블이름')
컬렉션 확인하기
show collections
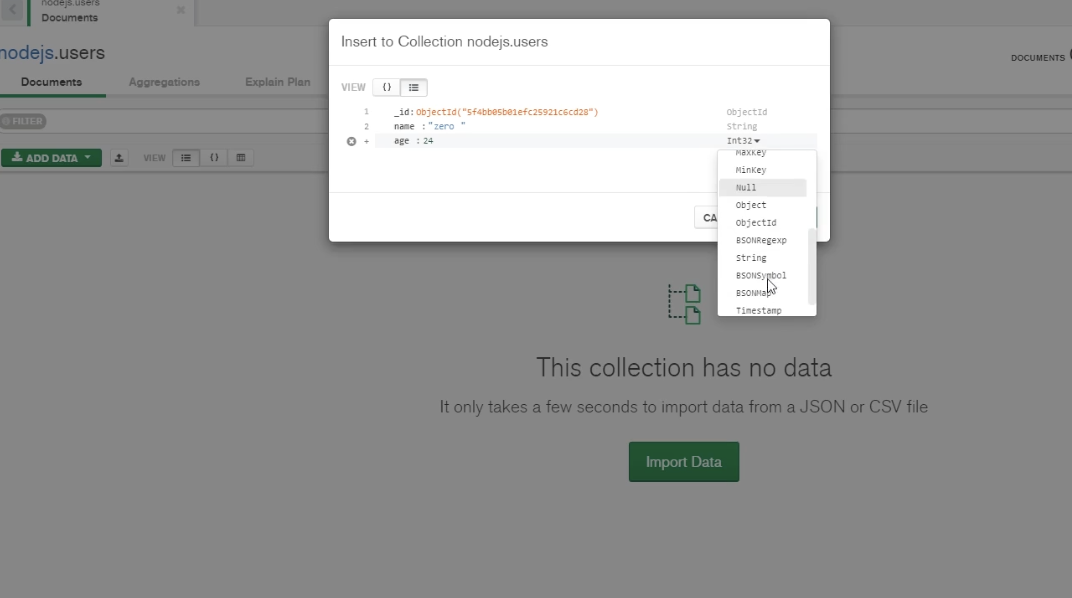
몽고디비는 칼럼이 따로 없고 ObjectId로 몽고디비의 자료형으로 저장한다. 고유 아이디 역할을 해줌
db.데이터베이스이름.save({name : 'solarthenomad', age : 25, married:false, comment : '안녕하세요' , createAt : new Date() });
몽고 캠퍼스를 통한 데이터 추가
💙 컬렉션 간의 관계 설정하기(Create)
- 컬렉션 간의 관계르루 강요하는 제한이 없으므로 직접 ObjectId를 넣어서 연결한다.
- 사용자의 OjectId를 찾은 뒤 다른 테이블 컬렉션에 넣기
db.데이터베이스1.find({name : 'solarthenomad'}, {id : 1})
db.데이터베이스2.save({commenter : ObjectId(''), comment : '안녕하세요', createAt : new Date()})
💙 컬렉션 조회(Read)
- find로 복수 데이터를 조회할 수 있고, findOne으로 단수 데이터를 조회하는 것이 가능하다.
db.데이터베이스이름.find({});
🐛 find 구문의 두 번째 인수로 조회할 필드를 선택할 수 있다.
- 이때 아래에서 1은 추가이고 0은 제외이다.
db.데이터베이스이름.find({}, {id : 0, name : 1, married : 1})
🐛 find를 한뒤 이쁘게 데이터를 보고 싶다면 sort메서드를 사용한다.
db.데이터베이스이름.find({}, {_id : 0 , name:1, age:1}).sort({age:1})
조회할 다큐먼트 개수를 제한하고 싶으면 limit 메서드를 사용한다.
db.users.find({}, {_id : 0, name :1, age:1}).sort({age:-1}).limit(몇개만 보여줄건지ㅐㄱ수)
건너띌 다큐먼트 개수를 정하고 싶으면 skip 메서드를 사용한다.
db.데이터베이스이름.find({}, {_id :0, name : 1, age:1}).sort({age:-1}).limit(1).skip(1)💙 수정(Update)
- 첫 번째 인수로 수정대상을, 두 번째 인수로 수정 내용을 제공한다.
- $set를 붙이지않으면 데이터 한 조각 전체가 아예 대체되어버림...
db.데이터베이스이름.update({name : 'solarthenomad'}, {$set : {comment : '안녕하세요. 이 필드를 한 번 바꿔보겟슘당!'}})
💙 삭제(Delete)
- remove 메서드의 첫 번째 인수로 삭제할 대상 조건을 제공한다.
- 삭제 성공 시 삭제된 개수가 반환된다.
db.데이터베이스.remove({name : 'solarthenomad'})
🌱 몽구스 ODM
- 객체와 다큐먼트 매칭할 수 있도록 함
- 테이블과 유사한 기능을 하되 기존 MongoDB가 가지지 않은 Join 기능을 추가해준다.
💙 몽구스 프로젝트 시작하기
✍ 라이브러리 설치
npm i express morgan mongoose
npm i -D nodemon
+ package.json에서 "scripts" : {"start" : "nodemon app"}
update 메서드로 쿼리
- 첫 번째 인수로 수정 대상을 ,두번째 인수로 수정 내용을 제공해주게 해야한다.
mongo
db.users.update({name : 'solar'}, {$set: {comment : '안뇽하세욤'}});
...
const morgan = require('morgan');
const mongoose = require('mongoose');
const connect = require('/schemas'); //스케마 연결
const indexRouter = require('./routes/index');
const userRouter = require('./routes/users');
const commentsRouter =require('./routes/comments');
...
app.use('/' , indexRouter);
app.us('/users', userRouter);
...
const connect =()=>{
if (process.env.NODE_ENV !== 'production'){ //개발 모드일때는 debug모드를 사용한다.
mongoose.set('debug', true);
}
mongoose.connect('mongodb://url', {
dbName : 'nodejs',
useNewUrlParser : true,
useCreateIndex : true,
} , (error) =>{
if (error) {
console.log('몽고디비 연결 에러', error);
} else {
console.log('몽고디비 연결 성공');
}
});
};
mongoose.connection.on('error' ,(error)=>{
console.error('몽고디비 연결 에러', error);
})
mongoose.connection.on('disconnected' ,()=>{
conosle.error('몽고디비 연결이 끊겼슘니당. 연결 재시도 하겠습니다.');
connect();
})
module.exports = connect;
몽구스 스키마 만들기
- schemas 폴더 안에 작성하기
- 정해진 데이터만 들어갈 수 있도록 강제함
- type은 자료형, require는 필수 여부, default는 기본값, unique는 고유 여부
- 필드 정의
schemas > user.js
const mongoose = require('mongoose');


const {Schema} = mongoose;
const userSchema = new Schema({
   name : {
      type : String,
      required : true,
      unique : true,
   },
   age : {
      type : Number,
      required : true,
   },
   married : {
      type : Boolean,
      required : true,
   },
   comment : String,

   createAt :{
      type : Date,
      default : Date.now,
   },
});

module.exports = mongoose.model('User', userSchema);
schema > comment.js
const mongoose = require('mongoose');

const {Schema} = mongoose;
const {Types : {ObjectId}} = Schema; //ref : UserSchema를 가리킴 . Mysql의 Join기능 : ref
const commentSchema = new Schema({
   commenter : {
      type : ObjectId,
      required : true,
      ref : 'User'  //UserSchema을 가르킴
   },
   comment : {
      type : String,
      required : true,
   },
   createdAt : {
   type : Date,
   default : Date.now,
   },
});

module.exports = mongoose.model('Comment', commentSchema);
routes>user.js
- 라우터와 db 연결하기
const express =require('express');
const User = require('../schemas/user'); //모델(스키마) 연결
const Comment = require(''../schemas/comment);

const router = express.Router();

router.route('/')
  .get(async (req, res, next) =>{
    try {
      const users= await User.find({});
      res.json(users);
    } catch(err) {
       console.error(err);
       next(err);
    }
  })
  .post(async (req, res, next) =>{ //데이터 받기
     try {
        const user = await User.create({
           name : rq.body.name,
           age : req.body.age,
           married : req.body.married,
        });
        await user.save();
        console.log(user);
        res.stats(201).json(user);
     } catch(err) {
        console.error(err);
        next(err);
     }
  });

  router.get('/:id/comments', async(req, res ,next) =>{  //user의 objectId > comments
     try {
        const comment = await Comment.find({commenter : req.params.id}) //ObjectId임
        .populate('commenter');
        console.log(comments);
        res.json(comments);
     } catch(err) {
        console.error(err);
     }
  });

  module.exports = router;
routes > comment.js
const router = express.Router();

router.post('/', async(req, res, next) =>{
   try {
      const comment = await Comment.create({  //댓글 만들기
         commenter : req.body.id,
         comment : req.body.comment,
      });
      console.log(comment);
      const result = await Comment.populate(comment, {path : 'commenter'});
      res.status(201).json(result);
   } catch(err) {
      console.error(err);
      next(err);
   }
});

router.route(':/id')
   .patch(async (req, res, next) =>{
       try {
        const result = await Comment.update({  //몽고 쿼리 : 수정
           _id : req.params.id,

        }, {
          comment : req.body.comment,
        });
        res.json(result);
       } catch (err) {
          console.error(err);
          next(err);
       }
   })
   .delete(async (req, res, next) =>{
      try {
         const result = await Comment.remove({_id : req.params.id});
         res.json(result);
      } catch(err) {

      }
   })
routes > index.js
const express = require('express');
const User = require('../schemas/users');

const router = express.Router();

router.get('/', async(req, res,next) =>{
   try {
      const users = await User.find({});
      res.render('mongoose', {users});

   } catch(err) {
       console.error(err);
       next(err);
   }
});

module.exports = router;